בפוסט הקודם ראינו כיצד ניתן לממש את תהליך ה-Retries – ההרצה החוזרת לטסטים שנכשלו בעקבות False Alarms
המימוש בפוסט הקודם נעשה בעזרת הפריימוורק – Junit
בפוסט זה אנו נראה כיצד לבצע את אותו מנגנון עם הפריימוורק – TestNG

מקרה הבדיקה שלקחתי כאן הינו בדיוק אותו מקרה כמו בפוסט הקודם: להיכנס לאתר: http://atidcollege.co.il ולוודא כי הלוגו של עתיד האוטומציה מוצג:

השתמשתי פה במתודת ה-isDisplayed, זוהי דוגמא למקרה של הרצה מוצלחת של בדיקה:
assertTrue(driver.findElement(By.className("fw-site-logo")).isDisplayed());
זה לפי ה-inspect של האתר ממנו לקחתי את המידע:

העבודה עם מנגנון ה-Retry של TestNG יעבוד עם מחלקה אשר מממשת את הממשק של IAnnotationTransformer והיא תראה כך:
public class AnnotationTransformer implements IAnnotationTransformer {

    @Override
    public void transform(ITestAnnotation annotation, Class testClass, Constructor testConstructor, Method testMethod) {
        annotation.setRetryAnalyzer(Retry.class);
    }
}
כאן אנו מאתחלים את מנגנון ה-setRetryAnalyzer עם מחלקת ה-Retry , במחלקה זו אנו מנממש את הלוגיקה של ההרצה החוזרת, כך למשל:
public class Retry implements IRetryAnalyzer {
    private int count = 1;
    private static int NumOfRetries = 3;

    @Override
    public boolean retry(ITestResult iTestResult) {
        if (!iTestResult.isSuccess()){
            //Check if test not succeed
            if (count < NumOfRetries) {
                //Check if maxtry count is reached
                count++;                                     //Increase the maxTry count by 1
                iTestResult.setStatus(ITestResult.FAILURE);  //Mark test as failed
                return true;                                 //Tells TestNG to re-run the test
            }
            else {
                iTestResult.setStatus(ITestResult.FAILURE);  //If maxCount reached,test marked as failed
            }
        }
        else {
            iTestResult.setStatus(ITestResult.SUCCESS);      //If test passes, TestNG marks it as passed
        }
        return false;
    }
}
במקרה שלי, החלטתי להשתמש ב-Report עם צילומי מסך, והחלטתי לחלק את התוכנית למחלקת ה-base ומחלקת TesCases, כך תראה מחלקת ה-base שלי:
public class base {
	static WebDriver driver;
	String URL = "http://atidcollege.co.il";
	String driverPath = "D:/Projects/SeleniumDrivers/chromedriver.exe";
	String reportPath = "C:/Test/myReports/ExecutionReport.html";
	String imagePath = "C:/Test/myReports/screenshot.png";

	public static ExtentReports extent;
	public static ExtentTest test;

	public String takeSS() throws IOException {
		File scrFile = ((TakesScreenshot)driver).getScreenshotAs(OutputType.FILE);
		FileUtils.copyFile(scrFile, new File(imagePath));
		return imagePath;
	}
}
וכך תראה מחלקת ה-TestCases שלי:
public class TestCases extends base {
	@BeforeClass
	public void setupTest() {
		System.setProperty("webdriver.chrome.driver", driverPath);
		driver = new ChromeDriver();
		driver.manage().window().maximize();
		driver.manage().timeouts().implicitlyWait(10, TimeUnit.SECONDS);
		extent = new ExtentReports(reportPath);
	}

	@Test(retryAnalyzer = Retry.class)
	public void CheckMyLogo() throws IOException {
		try {
			driver.get(URL);
			assertTrue(driver.findElement(By.className("fw-site-logoqq")).isDisplayed());
			test.log(LogStatus.PASS, "Test Passed");
		}
		catch (Exception exp) {
			test.log(LogStatus.FAIL, "Test Failed: " + exp.getMessage() + test.addScreenCapture(takeSS()));
			fail("Test Failed, See Error in Report");
		}
		catch (AssertionError asr) {
			test.log(LogStatus.FAIL, "Test Assertion Failed: "+ asr.getMessage() + test.addScreenCapture(takeSS()));
			fail("Test Failed, See Error in Report");
		}
	}

	@AfterMethod
	public void closeTest() {
		extent.endTest(test);
	}

	@AfterClass
	public void close()  {
		extent.flush();
		extent.close();
		driver.quit();
	}
}
זוהי דוגמא לכך שהתוכנית תעבור ללא בעיות.
אך במידה ואשנה את ערך זיהוי התמונה ל-Kuku כך למשל:
assertTrue(driver.findElement(By.className("Kuku")).isDisplayed());
מה שיקרה בפועל כשאריץ את התוכנית, זה שהתוכנית תיכנס לאתר, תנסה למצוא את התמונה ותיכשל, היא תבצע את פעולת הכניסה לאתר ווידוא הצגת התמונה 3 פעמים, כי זהו הפרמטר שהגדרתי לו תחת :
int NumOfRetries = 3
ניתן לראות את ההרצות ב-Tab של TestNG:
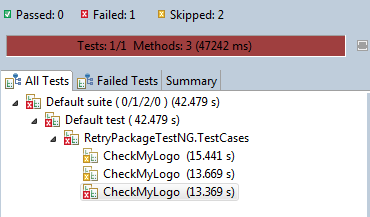
כך אני רואה בוודאות כי הטסט שלי רץ 3 פעמים לפני שהוא הודיע על כישלון כללי ומעבר לטסט הבא.